How to Convert a Fridge into a Kegerator
Turning a standard fridge or freezer into a kegerator saves money and lets you customize your draft system. Here is what you need to know before you start the conversion.
How to convert a fridge into a kegerator is simpler than you think. The direct answer: you need a temperature controller, a CO2 tank, a regulator, a keg coupler, beer lines, and a tower or faucet. Then you drill a hole for the tower, install the components, and set the thermostat to 38-40°F.
Many homebrewers and budget-conscious beer fans choose this DIY route instead of buying a dedicated kegerator. A standard compact refrigerator or chest freezer can work well after a few modifications. The main advantage is flexibility: you can pick a fridge that fits your space and budget, then add the draft components you want. This article covers the essentials, from choosing the right fridge to installing the hardware, so you can enjoy draft beer at home without paying a premium for a purpose-built unit.


Choose the Right Fridge or Freezer
Start with a fridge or freezer that can hold your keg and maintain consistent temperatures. A compact refrigerator (around 4.4 to 5.6 cu ft) fits a standard 1/6 or 1/4 barrel keg. A chest freezer can hold larger kegs but requires a temperature controller to keep the beer at serving temperature. Check interior dimensions: the keg must fit with room for the CO2 tank and lines. Many DIYers use a small dorm fridge or a converted chest freezer for the project.
Gather the Necessary Kegerator Parts
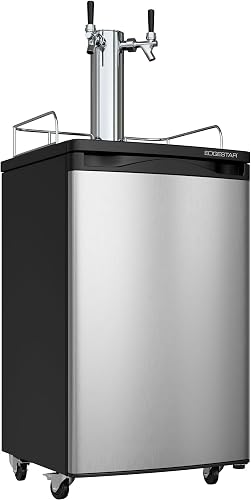
You need a kegerator conversion kit, which typically includes a CO2 tank, regulator, gas and beer lines, coupler, faucet, and shank. Some kits also include a tower. The Kegco K209SS-1 (ASIN: B00B8AAXLM) is a popular ready-made kegerator, but for a conversion you only need the parts. A temperature controller like an Inkbird or Johnson Controls is essential if you use a chest freezer. Also get a drill with a hole saw for the tower, and a step bit for smaller holes.
Install the Temperature Controller
Most fridges don't get cold enough for beer (38-40°F) or struggle to maintain a precise temperature. A temperature controller plugs into the wall and the fridge, and lets you set the exact range. For a chest freezer, the controller prevents the beer from freezing. For a fridge conversion, the controller ensures consistent temperature. Set the controller's probe inside the fridge near the keg. This is the single most important step for long-term satisfaction.
Drill and Install the Beer Tower
Mark the center of the fridge top or door where you want the tower. Drill a pilot hole from the inside to avoid cracking the exterior. Use a hole saw to cut a 1.5 to 2 inch hole. Deburr the edges. Feed the beer and gas lines through the hole. Mount the tower using the included bolts and washers, and seal with silicone caulk to prevent air leaks. If you are converting a freezer, consider a tower on the lid instead of the side.
Assemble the CO2 System and Lines
Attach the CO2 regulator to the tank. Connect the gas line from the regulator to the coupler's gas inlet. Connect the beer line from the coupler's beer outlet to the shank on the tower. Use worm gear clamps on all barbed fittings. Purge the system by opening the CO2 valve briefly. Check for leaks with a spray bottle of soapy water. Adjust the regulator to 10-12 PSI for most beers. Let the keg sit for 24 hours before serving.
Set the Temperature and Pour Your First Beer
Once everything is connected, set the temperature controller to 38°F. Wait for the fridge to stabilize. If you are using a freezer conversion, set the controller to a differential of a few degrees. After 24 hours, open the faucet slowly to pour. The first few pours may be foamy as the lines cool. After that, you should get smooth, cold draft beer. Many users report that a DIY kegerator outperforms some ready-made units in temperature stability and cost.
What to Avoid When Converting a Fridge
Do not use a fridge with a built-in thermostat that can't be bypassed. Avoid drilling into refrigerant lines. Check the fridge's compressor location before drilling. Do not skip the temperature controller with a freezer. Do not use plastic gas lines for CO2. Use only rated beer line (usually 3/16 ID). And do not block airflow around the compressor. With careful planning, your conversion will last for years.
Frequently asked questions
Can any refrigerator be converted into a kegerator?
Most refrigerators with enough interior space can be converted, but avoid models with refrigerant lines in the top or door walls. A compact refrigerator or chest freezer is ideal. Check the manual for a line routing diagram before drilling.
Do I need a temperature controller for a fridge conversion?
A temperature controller is recommended because many fridges do not hold a precise 38-40°F range. It ensures the beer stays at optimal serving temperature and prevents freezing. It is essential for chest freezer conversions.
How much does it cost to convert a fridge into a kegerator?
A basic conversion kit costs $100 to $250. A temperature controller adds $30 to $60. If you already have a fridge, total cost is around $150 to $300. This is much less than a commercial kegerator like the Kegco K209SS-1 at $758.84.
What size keg fits in a converted fridge?
A compact refrigerator (4.4-5.6 cu ft) typically fits a 1/6 barrel or 1/4 barrel keg. A chest freezer can fit a 1/2 barrel or multiple smaller kegs. Measure the interior height and depth before buying a keg.